


Grommets and Washers are similar to eyelets used for reinforcing an eyehole in fabric. Grommets are metal tubes with a flare on one side. The Washer is the flare without the tube, or washer. When put through an eyehole in fabric, the tube of the grommet gets pressed with a die and rolls around the washer. They are much sturdier and offer a cleaner finish than one piece eyelets. You may need to reinforce your fabric if it is lightweight so that the grommet doesn’t pull through the hole.
We offer different tools at different price ranges for setting grommets. Which you choose has to do with how many grommets you plan to set. If you are making one costume with lacing down the back, one of the cheapest options will most likely work for you. If you are making multiple pieces, or you know you’ll find more uses for the tool down the road you’ll want something more industrial, quicker, and versatile.

*Set it Yourself: Mallet and Die – This kit comes with four dozen grommets. That is enough to test a couple, then put grommets into a garment or two. It is available in Size 00 and Size 0, which are larger. You can order more grommets by the dozen or gross in a variety of colors for future projects. The kit includes a cutting die, cutting board, and the two part die/base to set the grommet. You’ll need a Rubber Mallet to use this kit. It is not recommended to use a hammer, you may damage the die.
After you’ve marked the location of your grommets, you place your garment over the cutting board and center the cutting die over your marking. (On a sturdy table or the floor) Hit the cutting die with a rubber mallet to cut a circular hole in your fabric or leather. Then place the base on a solid surface, and place the grommet onto the die. Place your garment onto the grommet with the right side facing down. Place the washer over the grommet onto the lining side of your garment and put the die into the tube. Hit the die with a rubber mallet until it has crimped fully and is tight. If you live in an apartment with downstairs neighbors, don’t plan on doing this at midnight.
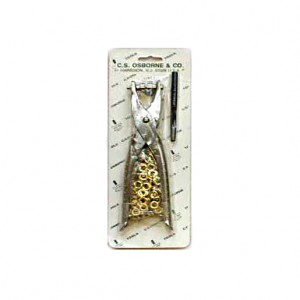
* Pliers – The Grommet Setting Pliers come with a gross of grommets, thats 144 to you and me. The kit has the pliers and a cutter. It is available for Size 00 grommets only. You can order more grommets in different colors by the dozen or gross. You will use the cutter to cut nice clean round holes for your grommets with either your own brute strength and twist back and forth or with a hammer onto a cutting board. It depends on what type of fabric or leather you are using. The pliers are fairly self explanatory, you put the grommet on one side, the fabric with the pre cut hole goes over the tube in the grommet with the face facing the grommet. The washer goes on next to the lining side, then you use both hands to squeeze the pliers closed, crimping the tube of the grommet onto the washer nice and snug. The pliers are quieter, for sure. They are more suited for lighter weight fabrics. If you have thicker fabrics or leathers you may want to go with the hammer and die technique so that you can get enough pressure to crimp the grommet.
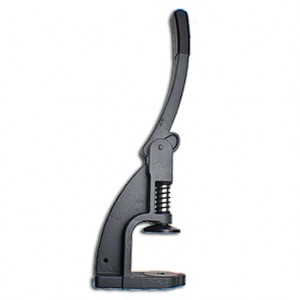
* Hand Setter – The table mounted hand setting machine is perfect if you have many grommets to set. It comes without dies. You can purchase the dies to set Size 0 Grommets, Size 00 Grommets, Size 5 Grommets, Size 12 Grommets (Giants!), Rivets, Covered Buttons, and Snaps. Dies can be found below the product here. You need screw it to a sturdy table.
For setting grommets, you will need to use an awl, cutter, or the cutting die to make the hole for the grommet. The bottom die has a spike of sorts that stands up, you place the washer over the spike, garment over the spike right side up, then the grommet. Pull down on the handle and it will crimp the grommet in place in a second. You may need to adjust the height of the top die up or down to make sure that the grommet is crimped enough for the thickness of the fabric or leather you are using.
~Happy Corseting, Amy Delicious


I am in the process of making my very first corset. Cant you tell me what size of grommets should I use for flat lace that is 1/4″ wide?
Hello,
Thanks for your question.
I would suggest either the size 00 or 0 for a corset. The size 00 is smaller than the 0. The 1/4” Flat lacing will fit into either size grommet. Basically it’s aesthetics as to which you choose.
I prefer the smaller 00 Grommets (3/16? inside diameter). The 1/4? lacing fits just fine, it’s not rigid, it curves around the Grommet and gets narrower when you pull on it. I place them closer together (3/4” spacing from center to center of the Grommets). Although you need a longer piece of lacing to go back and forth between more Grommets, I feel like it gives a more comfortable coverage over your back. Even with a modesty panel under the lacing, if you are wearing the corset tight, I feel like the closer together the Grommets, the lacing isn’t as noticeable.
Some people like to use the size 0 Grommets (1/4? inside diameter) and place them farther apart. That way they don’t need to set as many grommets. You can use the 1/4” lacing, or if you ever wish to change the lacing out to something more decorative like a bright colored Grosgrain ribbon, it will still fit. If you aren’t tightening the corset too much, you can space the Grommets however you like.
Thanks,
Amy