


We’ve all laced shoes before, right? Should be a no-brainer to lace a corset. Except that you need to tighten it at the waist, not at the top or bottom. There are many different ways to lace a corset, I’ll let you know about a couple of good ways.
Standard Lacing: This is how we do it. We find it easier to work with alone or if a friend laces you up, it is very effective and aesthetically pleasing. The extra cross over at the waist allows for extra tightening at the waist and is more comfortable. You can have an even or odd number of grommets on each side and it works fine.
 Illustrations thanks to Lindsay Waibel
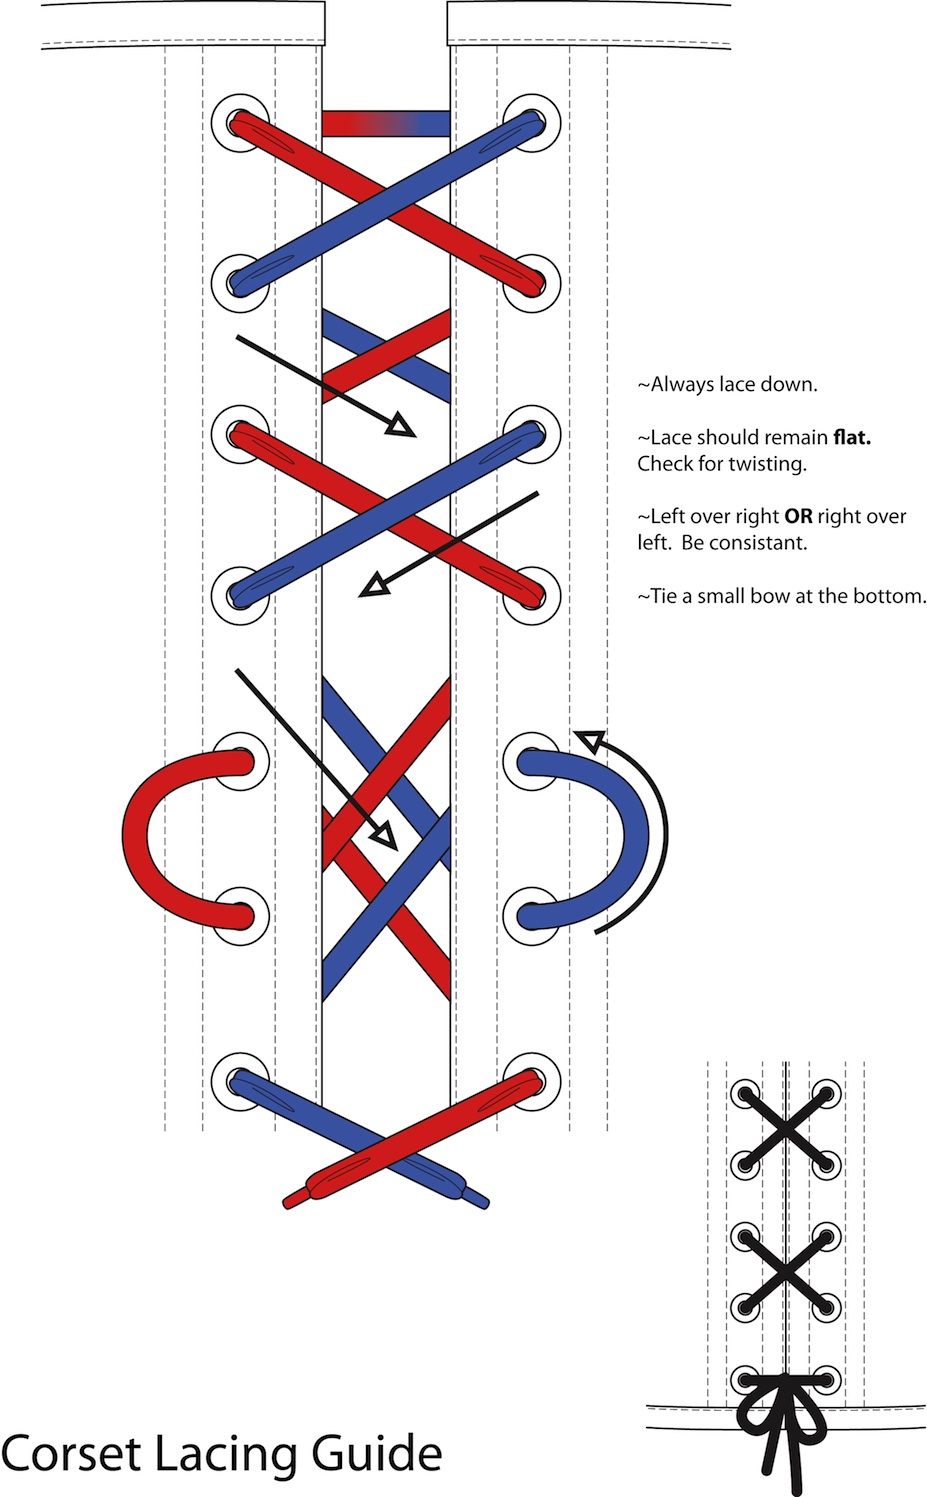
The change in colors is used just to show which side is which, this is based on one single lace, see at the top where the center turns from red to blue.
Mark the waist line if you can’t see it easily, you will need two grommets on each side to be at your waist. You can use a straight pin either horizontally or vertically so you remember to stop at the waist.
Mark the half way point in the lacing with a safety pin.
Start from the top of the corset and bring the laces through the grommets from the inside (lining side) out. The safety pin will be centered while you lace the corset, and based off of the pin you will adjust the laces when you are finished. Cross the laces (left over right) and put the tip through the next grommet from the inside again. Repeat until you get to the waist line. Keeping the laces flat and not letting them twist makes for a more professional and neat looking corset. Yes, they will twist when loosening and tightening, but you can actually smooth them out much more easily if you start with tidy laces.
Keep it consistent. If at each place the laces cross each other the left side goes over the right (Or right over left) it will make a huge difference in the overall look.
At the waist, skip a grommet still coming from the inside to the outside, but don’t cross the laces. On each side bring the lacing through the same side into the grommet you skipped. Don’t pull the lacing all the way through toward the bottom of the corset. Leave most of the excess lacing at this loop. This will be the loop you use to tighten the corset and tie it off at the waist. Again, cross the laces and proceed as you did before. When you get to the bottom tie off in a small bow. Even out all of the laces starting with the safety pin at the top down to the waist, then the bow at the bottom up to the waist. When you are finished remove the safety pin and tie all of the excess laces into a big bow.
X’s: If you’ve seen a corset laced with X’s on the outside and alternate X’s on the inside it’s for tight lacers. When you lace a corset like this you can get the back edges completely closed, edge to edge, no gap at all. If you don’t intend to completely close your corset you do not need to use this method. You may choose to if you just like the look.
Lacing in this manner requires more forethought. Before starting, determine where your two grommets at the waist will fall. It is best if there is an odd number of grommets at the bottom of the corset.
If there is an odd number at the top start with the ‘bar’ on the outside. The following directions are for an even number of grommets at the the top. This way the ‘bar’ is on the inside.
Illustrations thanks to Lindsay Waibel
The change in colors is used just to show which side is which, this is based on one single lace, see at the top where the center turns from red to blue.
Mark the half way point in the lacing with a safety pin. Start from the top of the corset and bring the laces from the inside (lining side) out. The safety pin will be centered while you lace the corset, and based off of the pin you will adjust the laces when you are finished. Cross the laces (left over right) and put them through from the face side (outside) to the lining side. Cross the laces again (left over right), this time put the laces through the grommets from the lining side to the face side. At the waist, skip a grommet and come from the inside to the outside, but don’t cross the laces. On each side bring the lacing through the same side into the grommet you skipped. Don’t pull the lacing all the way through toward the bottom of the corset. Leave most of the excess lacing at this loop. This will be the loop you use to tighten the corset and tie it off at the waist. Again, cross the laces and proceed as you did before. When you get to the bottom tie off in a small bow. Even out all of the laces starting with the safety pin at the top down to the waist, then the bow at the bottom up to the waist. When you are finished remove the safety pin and tie all of the excess laces into a big bow.
If you have an even number of grommets, your bow at the bottom will fall on the inside or lining side of the corset.
“Can’t I just lace it from the top to the bottom and not put a loop at the waist? It’s easier that way.”
No! (Well, you can do whatever you like, actually.) Take the time to figure it out, it will pay off if you are wearing the corset more than once. The main function of the corset is to give you an hourglass waist. You will want to tighten the corset from the bottom up to the waist, and from the top down to the waist. When it’s all nice and tight and you cross the laces to make the knot and bow you can give it that last little pull and accentuate the waist even more.
Now, loosen those laces, put on your corset, and show it off!
~Happy Corseting, Amy Delicious


