


We’re so excited to now be offering thermoplastics – a great addition for our cosplay and theater clients!
We’ve included some videos below as a starting point to learn more about these amazing materials.
Fosshape:
Wonderflex:

New: Global Categories!
An easy way to see ALL products! View All or filter by department and tag.
We’re so excited to now be offering thermoplastics – a great addition for our cosplay and theater clients!
We’ve included some videos below as a starting point to learn more about these amazing materials.
Fosshape:
Wonderflex:
Click the link below for helpful tips on testing and evaluating the bond for Bosal interfacing.
Bosal Cutting Table Tips
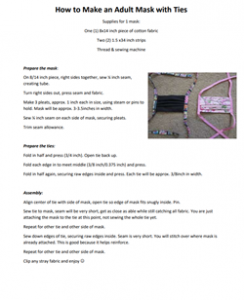
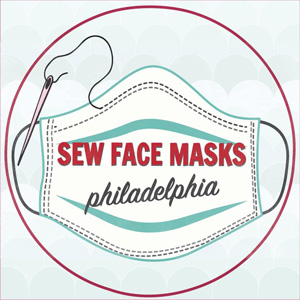
There are now many online resources, patterns, and tutorials to help you learn how to sew various types of face masks.
We’ve compiled a list below recommended by our friends at Sew Face Masks Philadelphia to help get you started:
Deaconess Style:
How to Make a Face Mask – Link to Face Mask Tutorial.
Deaconess How-To Video:
How-To: Mask with Elastic PDF
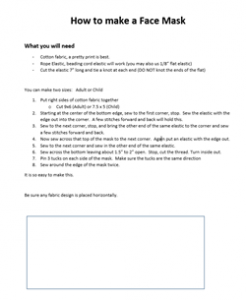
How-To: Mask with Ties PDF
Todaro Philly Face Mask:
Designed to have 2 layers of material, elastic ear loops or fabric ties, and a wire nose piece. It is made to be worn alone, with a filter, or over a N95 mask.
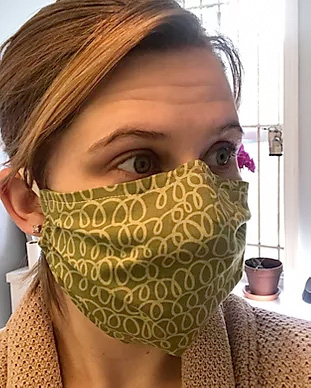
Todaro Philly Pattern >>
Todaro Philly Tutorial >>
RCoA Face Mask:
Please use the Men’s Pattern linked below, as it fits over the N95 mask. Two layers of cloth with options for a pocket, elastic or fabric loops.
RCoA Pattern >>
RCoA Tutorial >>
Leah Day Face Mask:
A beginner-friendly mask, similar to the Deaconess Face Mask, with improved fit.

Leah Day Pattern >>
Leah Day Tutorial >>
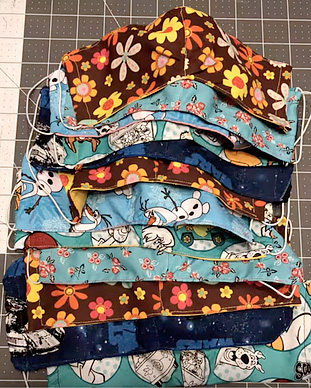
It’s been amazing to witness the tireless support of sewers and creators who are making face masks for essential workers and for the community at large!
There has been a huge priority shift as the costumers, crafters, and designers who we work with on a regular basis are now putting their skills and efforts into helping prevent the further spread of Covid-19.
It’s been extremely difficult to source many of the supplies needed to create face masks – many supply chains are breaking down both within the US and abroad. Items like elastic, interfacing, lacing, and cotton fabrics are becoming scarce and hard to find. We are actively forming new relationships with factories and other manufacturers so that we can continue to provide these supplies to the people who need them most.
We’d like to give a shout out to our local Philadelphia Mask Makers, check them out below!
Sew Face Masks Philadelphia (Website)
Sew Face Masks Philadelphia (Facebook Members)
Sew Face Masks Philadelphia (Facebook Public)
Channel PHL 17 Report
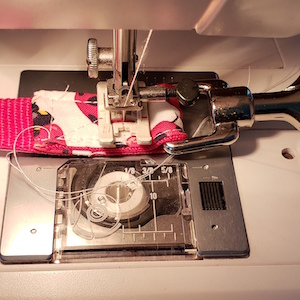
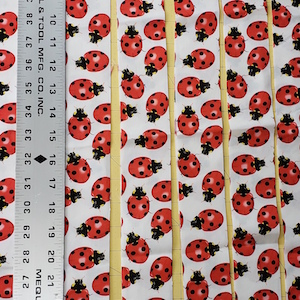
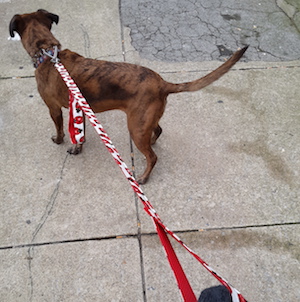
A dog leash takes only moments to make and just two items, nylon webbing and a swivel hook. But you can customize them so you and your pooch stand out from the crowd with some fabric scraps very easily.

Most dog leashes are either 4 foot or 6 foot long.
For a 6 foot leash, you’ll need 7 feet of webbing, for a 4 foot leash, 5 feet.
Simple simple simple, just insert the one end into the swivel hook, fold it over about 2” and sew it down, well, to make sure it is going to hold when your dog sees a squirrel or rolls around with another dog friend. The swivel hook is thick so your presser foot won’t be able to get too close, so plan on stopping the stitches at least the width of the foot away from the edge.
I like to sew a square and an X in the middle to make sure it’s not going to come apart.
Fold over at the other end about 8” for the handle and sew that end as well.
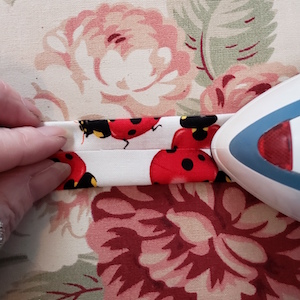
Customize your leash with fabric scraps!
I’m using some scrap ladybug fabric I had. I cut strips 2” wide and sewed them together so it’s long enough for a 4’ leash. I needed 2 strips of 44” wide cotton to cover all of the webbing for one leash, so in cutting 2 strips I only used a 4” x 44″ of scrap of fabric.
Fold the raw edges in and press them to have the finished piece 1” wide (the width of the webbing).
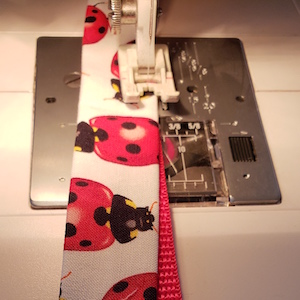
Sew the fabric to the webbing leaving a little at each end to fold over the raw edge of the webbing. You can also just zig zag over the end of the webbing and fabric.
We live in the city and not everyone wants my dog to approach them and beg for pets. I always add a second handle on the leash so that I can keep her much closer to me when we walk past strangers. For the placement of the second handle you’ll have to figure out depending on the size of your dog and your height. My dog is medium height and I’m short, so I put the handle 15″ from the swivel hook.
Dog leashes make great donations to pet rescues and shelters. Some rescues have a retail area where they sell leashes, harnesses, and treats to offset the costs of feeding the pets waiting for a home. If you have a few minutes and a few supplies you can make quite a few leashes for donations. Monetary donations can be made to PAWS here: https://phillypaws.org/donate/
~Happy Sewing!
Amy

Meet Bud, a 9 year old with early arthritis and carpal laxity syndrome. Carpal laxity syndrome is a common problem in medium to large, rapidly growing puppies most often starting between 6- to 12-weeks old.
He is being treated by a holistic veterinarian, but his mom Beth wanted to give him some extra comfort. So she made him some ankle braces that are giving him some extra support and pain relief.
Beth used a ticking which is a sturdy breathable cotton, sewed on the bone casings, and inserted white steel boning. The white steel will offer support, but it’s flexible, so it won’t restrict all movement or poke into his legs.
She added padding and a lining, then finished the edges with heavy duty twill tape. She sewed on some velcro to attach them to his legs.

You can see that the braces will help keep his ankles supported without interfering with his walking.
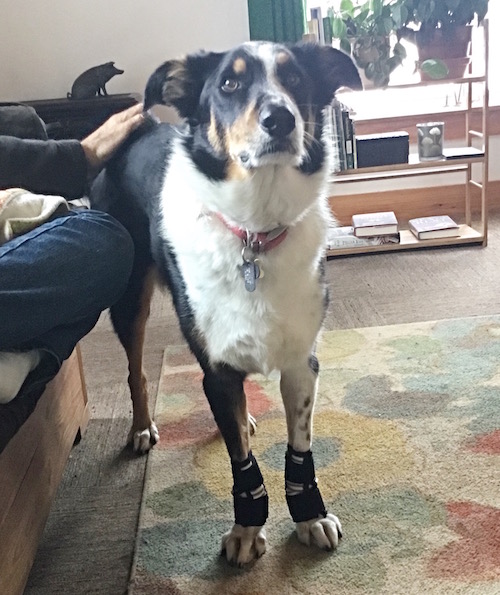
Here’s Bud rockin’ his ankle braces!
Thanks for the photos and letting us know what you do with our supplies.
~Amy
On June 11th, 2017 we vended at the Morris Arboretum at the University of Pennsylvania in Philadelphia. It was their annual Steampunk Expo. Despite the heat is was a lovely day. There were about a dozen or more vendors offering a wide variety of wares. Quite a few of the attendees were dressed in amazing outfits, and there were many children who already have a great idea of the Steampunk aesthetic. Plus, the Arboretum itself is not to be missed.
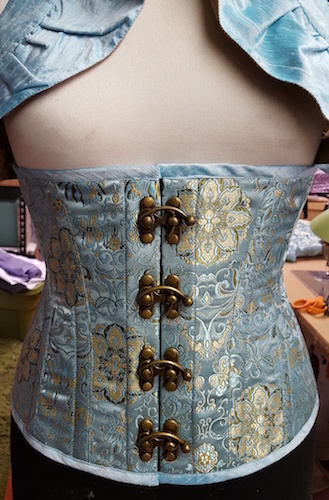
I just wanted to share the wonderful new outfit we at Delicious Corsets made for me to wear at the Expo.

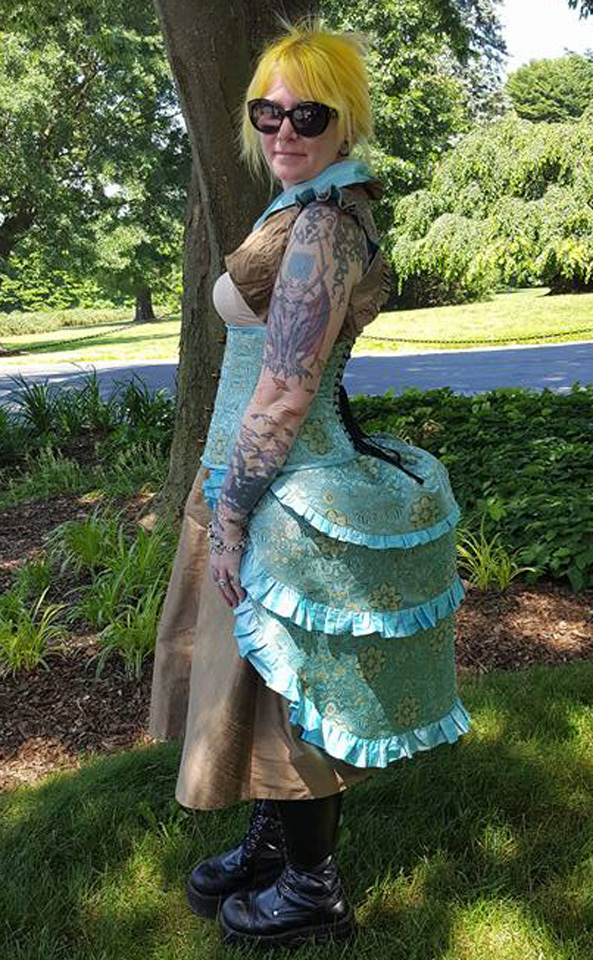
The corset I wore is the one we made for the tutorial on how to set our Steampunk Swing Clasp Busk Sets. Check out the Steampunk Swing Arm Clasp Busks, and check out the Steampunk busk tutorial . I’ve been making and wearing corsets for 25 years, this was my first corset with a Steampunk Swing Arm Clasp closure. After wearing that corset all day vending 10am till 5pm, it was the EASIEST corset I’ve ever worn to get off of my overheated body. I can’t recommend them enough! Just lift the 4 arms and POP, you are released!
Of corse I had to wear a bustle! Go big or go home when it comes to Steampunk styling. We offer many patterns on making hoop skirts and bustles.
I know, I know, I should have been wearing a mini top hat! It was over 95 degrees and although there was shade, the air was still. No hat for me that day! (Plus, we ran out of time! Oops)
We do offer many supplies to make the perfect hat, send us your photos of what you make!
Hat Patterns
Buckram
Millinery Wire
Hat Bases
Hat Ribbons
Hat Ornaments
~Happy Sewing, Amy
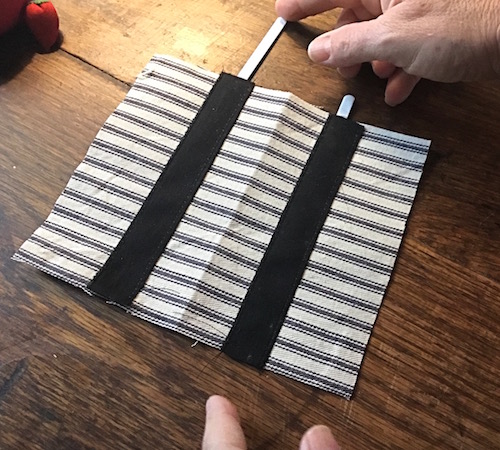
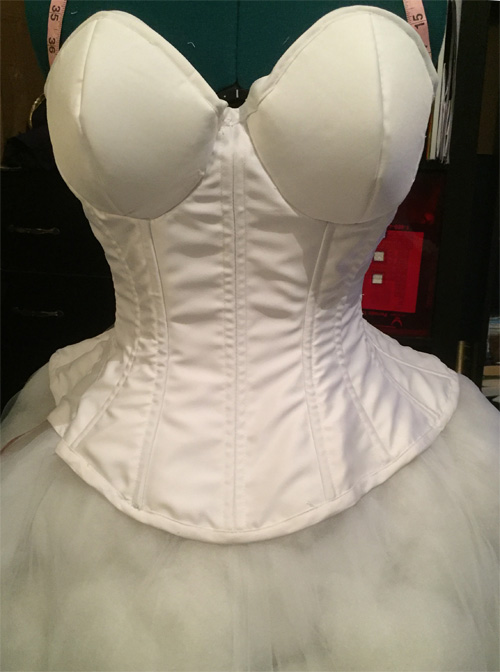
We’re so excited to be able to offer these Steampunk Swing Arm Busk Sets!
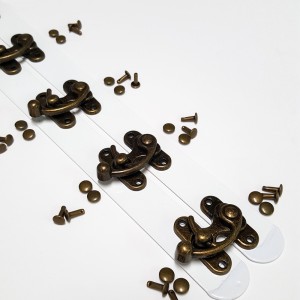
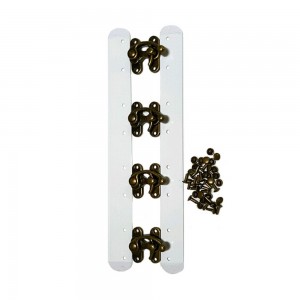
So many of you have asked about what boning to use, how to drill holes, what length rivets you’d need, and how to set them. Finally, it’s all in one place.
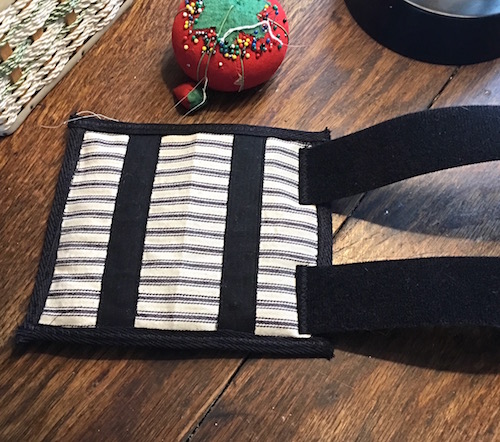
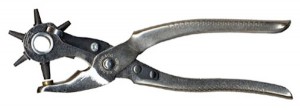
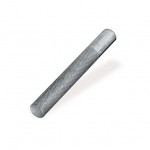
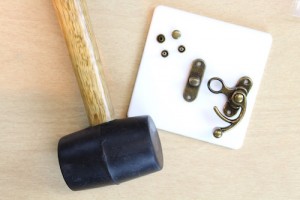
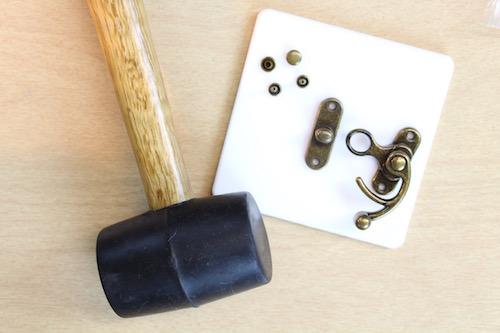
The 1″ wide boning is pre drilled to fit the clasps. We now offer the kits in 10″, 12″, and 13″ for most underbust and overbust corsets. The 10″ busks have 4 clasps, the 12″ and 13″ busks have 5 clasps. Each kit comes with enough rivets for each of the clasps. We suggest a Revolving Hole Punch to cut holes in your fabric or leather and a Rivet Setter is necessary to set the rivets.
Technique…
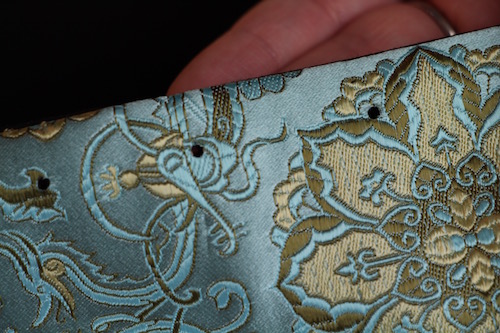
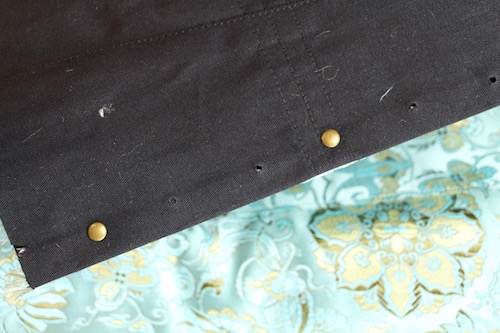
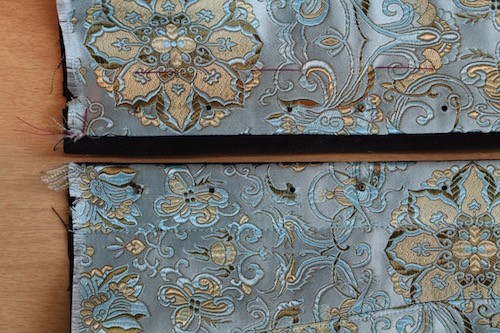
For the corset involved in this example, we used silk brocade as our face fabric and black corset coutil for our lining. The black bone casing is sewn to each seam allowance on the face. We’ve added a strip of 2″ wide black corset coutil under the brocade at center front to reinforce it against the boning and rivets. We also place strips of black corset coutil at center back to reinforce the fabric at the grommets for lacing. The face of the corset is sewn to the lining at center front and center back.
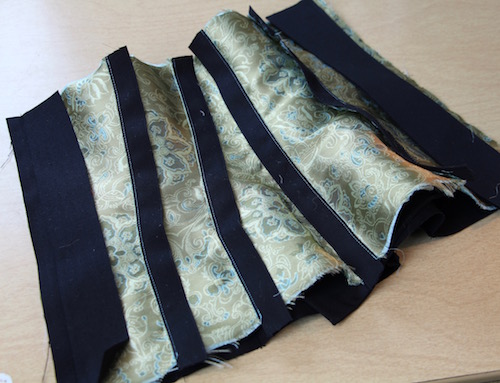
You should press the center front and back seams open to make sure it is nice and flat. We also pin the layers together to keep them from moving. Make sure the size busk you choose has enough room at top and bottom to finish with either bias tape or some other trim tape. We leave 1/2″ to 5/8″ space at top and bottom for bias tape.
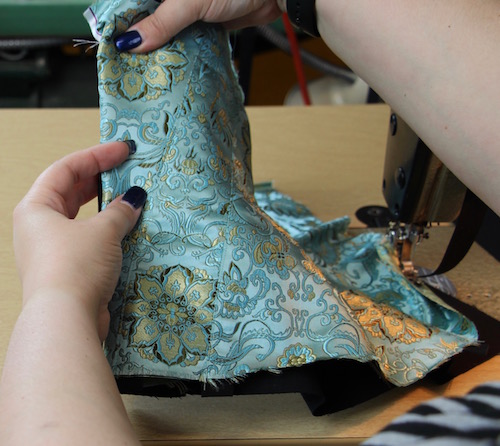
Place the boning with the holes closest to the CF edge evenly spaced top and bottom. When the busk boning is inserted in between the layers of fabric, it doesn’t go all the way to the seam, it probably sits back about 1/8″ or a little less.
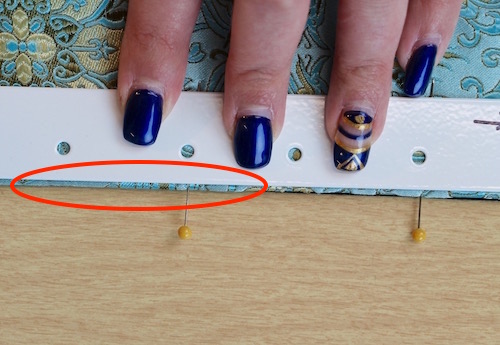
Make sure the right and left sides are lined up to match, and mark the holes with a pen, pencil, chalk pencil, or pin.
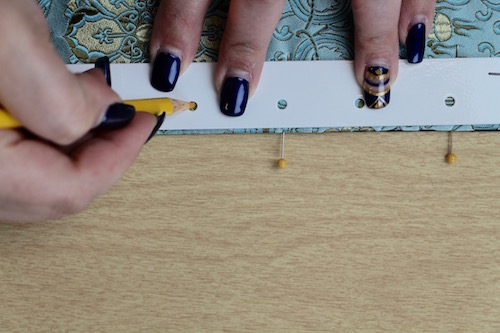
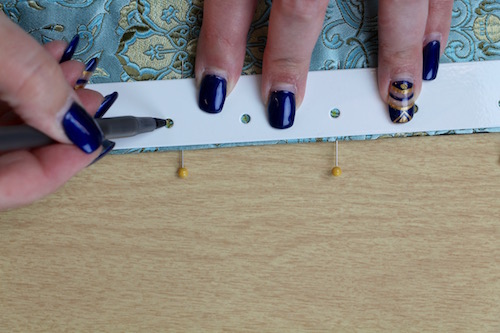
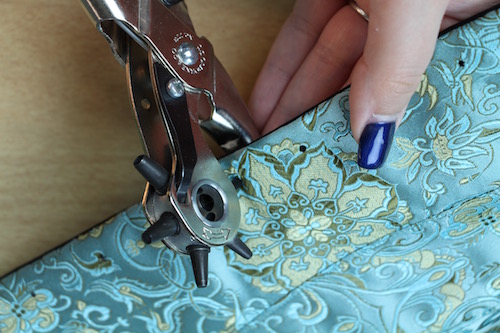
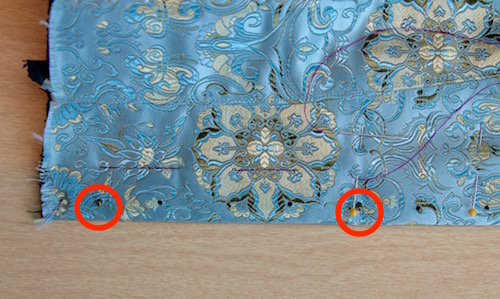
For making the holes, we found it is easiest to use a Revolving Hole Punch. Test the hole size on a test fabric first, you want the hole as close to the same size as the post as possible, probably just a bit smaller than the hole that is drilled in the boning. Cut all of your holes, then put the boning in between the layers and pin in place. Make sure you line up the holes you cut with the holes in the boning.
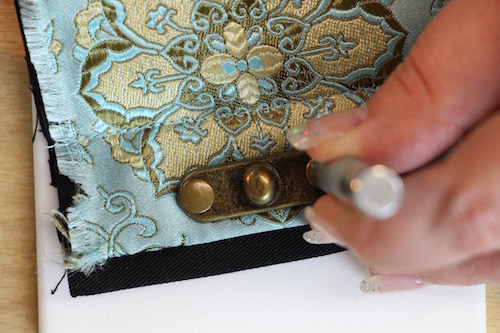
You can also use a CorsetMakers Awl, it will just take more time to separate the weave of the fabric to get the rivet post through.
We found that putting (not setting) a rivet post or three (top, middle, bottom) into the holes while sewing helps keep your fabric from moving while topstitching. It’s easier to keep the holes in the busk lined up with the holes in the fabric that way.
Hand tack the boning in place so your face fabric doesn’t move or warp while topstitching.

Topstitch the boning in place using a zipper foot. You can see the post of the rivet sticking out of the fabric while it is being topstitched below.
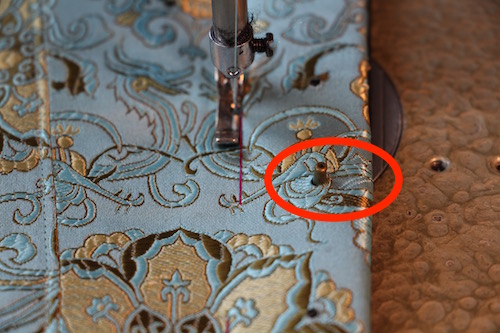
Topstitch both sides. Remove the basting stitches.
Setting the rivets: Insert the post of the rivet from the lining side up through the boning and face fabric, I’d recommend inserting both rivets for one clasp at the same time so that you are sure you are lining up the proper top and bottom spacing.
Place the top or cap of the rivet on the post. You’ll need to put the bottom post of the rivet on a Crafting Board or rivet Anvil to set it.
Place the Rivet Setter on the top of the rivet and hit it with a Rubber Mallet or wooden mallet. Start lightly, if you pound it too hard you can damage the rivet. When you are sure it is set, move on to the second rivet holding the clasp down. Continue in the same manner until all of your clasps are set.

Finish the rest of your corset as you normally would, topstitch bone casings, center back seam if you haven’t sewn it yet,finishing top and bottom edges, and boning and grommets at center back. (For reference, this is the 10″ Steampunk Swing Arm Busk Set with the 4 clasps, the 12″ and the 13″ have 5 clasps.)
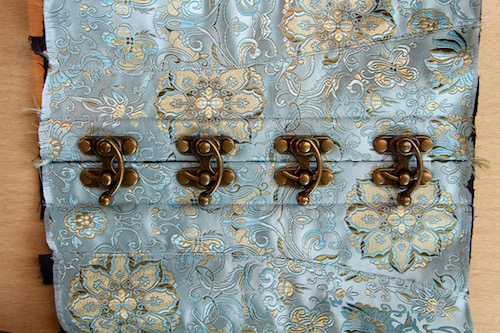
Admire your work!
~Happy Corseting, Amy
This is a tutorial of the Yaya Han Overbust Corset pattern with cups by Jack Spicer at:
https://www.facebook.com/Spicercosplay/
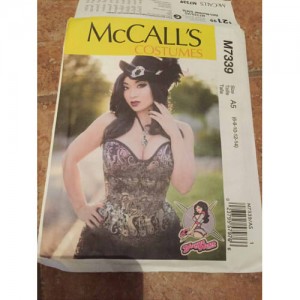
For a beginning seamstress, corsets can seem very intimidating, but they are more meticulous than difficult. Yaya Han’s Overbust/ Underbust Corset Pattern for example, is pretty accessible to beginners who are willing to put the time in, especially into looking at the instructions first. Probably the most important part to this is looking over the instructions before even cutting out pattern pieces.
Starting out, I felt comfortable cutting out the pattern pieces as they were because I personally fit into the sizing categories set by patterning companies. If you know your measurements are off from those listed, this is a good opportunity to alter the pattern. This can be accomplished by using a marker to mark lines between sizes to achieve what you need.
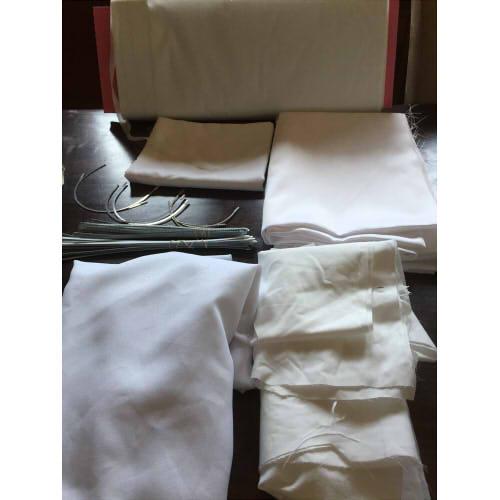
Besides the pattern, the most important components of making a corset are going to be your fabrics, and boning/underwire. For this corset, I will be using heavy bridal satin for my fashion fabric, cotton broadcloth for my underlining, and some silky lining fabric as my lining.
As for the boning and underwire, I bought them from CorsetMaking.com. The pattern will tell you what size and length of boning you will need, but if you alter your pattern how I did, those lengths will change. For example, I altered the back of the corset to not rise at the top, and instead of needing the 16 inch boning, I just went with the 12.5 inch. If you are just starting out with patterns in general, I recommend just doing the pattern as is, or making a mock up. If you are going to make a mock up, make sure to use fabrics with a similar weight to get a better idea of how it will drape.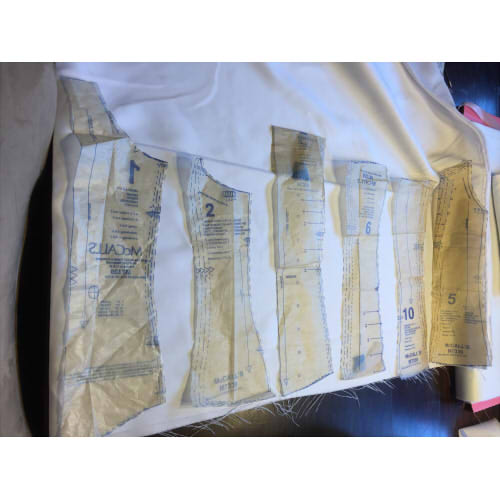
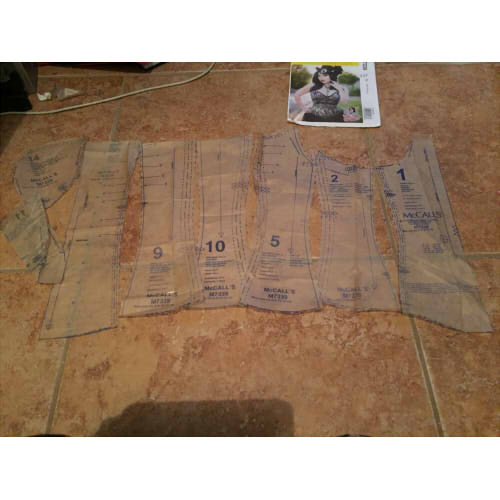
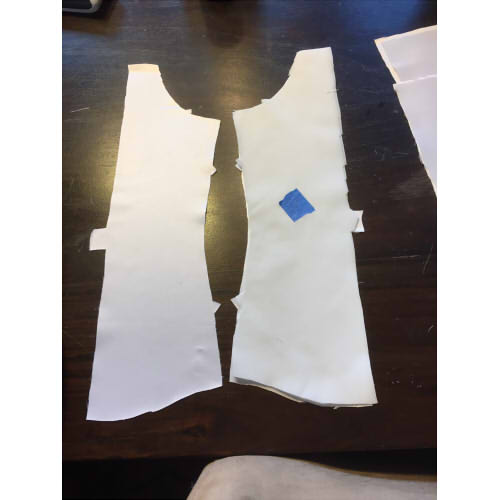
Once you have all your materials assembled, it’s time to cut your fabric! You can either pin your pattern pieces to the fabric, or use pattern weights. I’m personally a bigger fan of pattern weights, as they take less time, and leave your pattern pieces in better shape. An important thing to note here is cutting out the notches (the triangles on the edge of your pattern pieces) as those will help you in matching pattern pieces later. If you are using a patterned fabric, it is important to put some thought into how you will be cutting it, for example, making sure that stripes are all going the same way.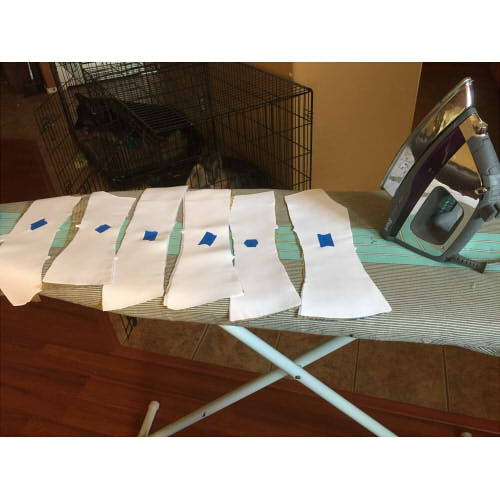
Here you can see the pieces notched, and labeled. I just used plain blue tape to number them all since with corsets in particular, all the pieces can look more or less the same. Also pictured here is my iron. Ironing between every step in sewing something makes a bigger difference than it might seem, and I’m getting off to a good start here by ironing out all my pieces before I even get started in sewing. Make sure to take note of your iron settings depending on the fabrics you are using.
Underlining (or flat lining) in a corset is important because part of its job is to absorb the wear and tear so that your fashion fabric will last longer. It differs from interfacing because you underline every piece, but you only interface certain parts that might need extra structure. The underlining pieces are attached to the wrong sides of the fabric, and then they will be used as the same piece for the remainder of the project. Use a basting or long stitch to attach the pieces.
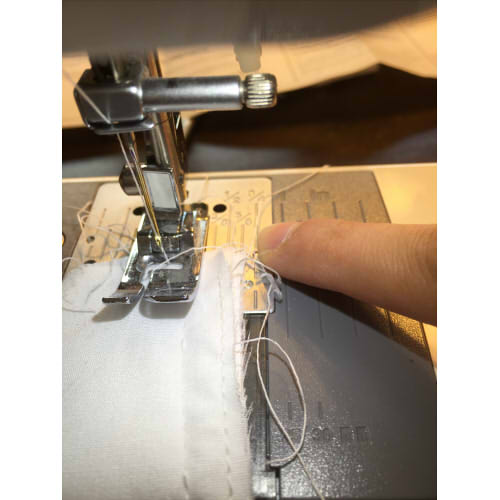
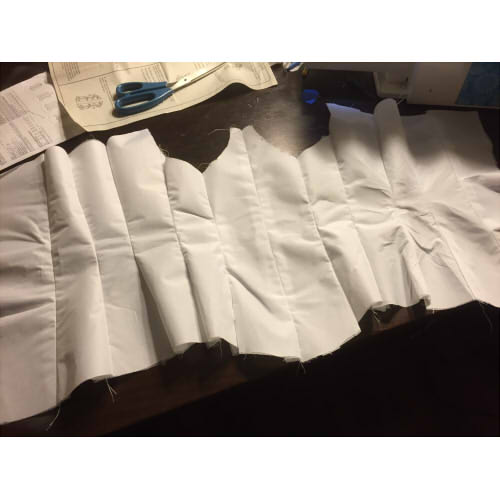
Once you’ve underlined all the pieces, it is time to start sewing. The first pieces that are going to go together are number one. It is important to take a note on the seam allowance in this pattern as part of it uses 5/8″, and then another part of it uses 3/8″. If your machine has guide lines, they are a great way to keep your seams straight as you watch the edge of the fabric go along that line as it is sewn. This part of the pattern is sewn at 5/8″ of an inch as shown here. If your machine does not have guidelines, masking tape can make a good place holder.
As you sew your pieces, it is really important to press your seams! Not only does it make everything look neater, but when it comes to corsets, this is going to be your casing for your boning down the road. And you will be thanking yourself later when you’re sewing them down and they are lying flat for you. The pattern will tell you how to press them, and in which direction. Also, here you can see how nicely the notches line up and keep things looking neat, as well as guiding where you should line up your pieces together.
After you’ve gotten your outside corset all sewn up, the next step is to get your lining done. It is done the same way as your outside fabric, except this time you are just going to press your seams open, and put it to the side. The lining not only serves as another layer of defense to your fabric, but it will also keep the inside of your corset looking neat and tidy.
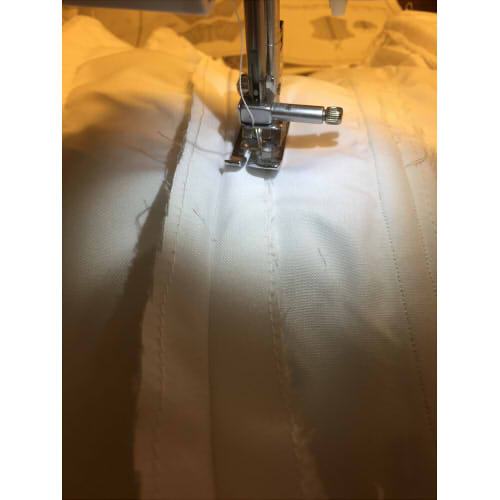
It’s time for casing! The casing was one of the most fun and interesting parts of this project for me because I was trying very hard to make sure that the stitching would come out just so on the outside of the fabric because for one, my fabric in particular was a little unfriendly in that it was going to show any hole pierced through it! But I had a very handy trick to help me out here. Whichever side of the foot was closest to the seam, I would sew and make sure that there was a set distance between the foot and the seam so that the stitching would come out evenly against the seam.

It is really satisfying to get that nice straight stitching on the outside of a corset. Another note here would be to sew slow. Corsets look as good as the time you put into them. And it can be clear if you are rushing through it in how the stitching looks. Here, you can flip your corset over to work on the right side of the fabric, and go back over the stitches you just sewed down.

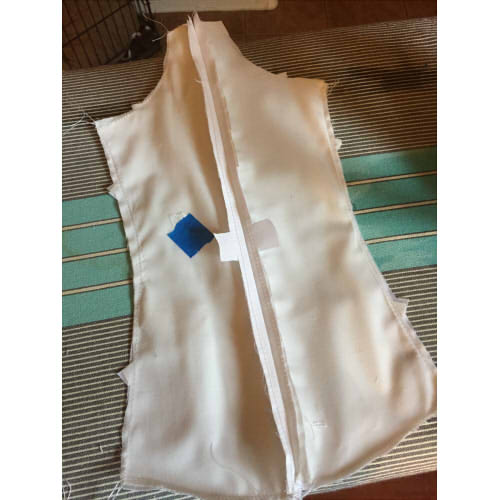
After all the casings are finished, you’ll want to grab your finished lining, and attach it to the fashion fabric, right sides together. Here, I lined up the last seams between them before sewing so that when I turned it out later, it would be easier to line up seams throughout the whole corset without bunching. For this step, you just need to sew up the sides of the corset, and then turn it out, and press. Only sew up the sides of the corset. Leave the top and bottoms alone, as they will be finished later.
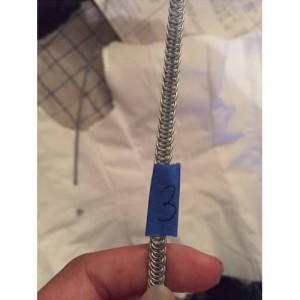
Now it’s time for boning! For sewing in general, it’s a good idea to have a plan before jumping that in. For corsets, a good plan would be to number the boning to know where it will go in your corset. For flat boning, you can just write directly on it with a marker. For the spiral boning, a bit of masking tape will do the trick. Just slide your boning into the channels you made, and your corset will be on its way!
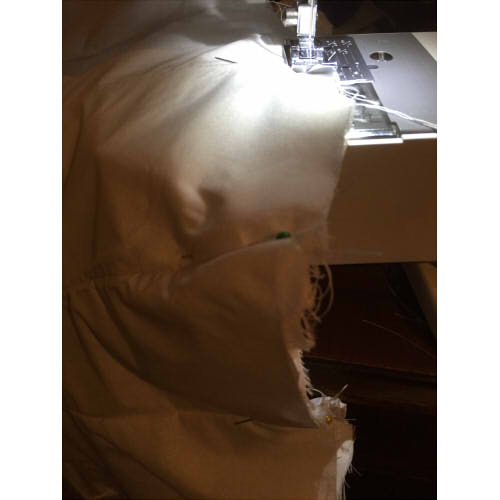
After you put in your boning, it’s time to live in fear of breaking your needles! Luckily, I only ended up breaking one with this corset. That is part of what makes basting the lining and outer fabric together even more useful. Once you are done, you’ll have a useful guide line for where it will be safe to sew and not hit boning. Here I lined up the seams as I was sewing, and went slow to make sure my needle wouldn’t hit the boning. If you’re using steel and it comes down to the needle or the boning, the boning will win every time.
***Using Bone Casing and sewing both sides of the casing before inserting the boning is the best way to save your sewing needles. You can sew down the two sides of the casing from the inside, there are divots you can follow on the casing. Or, use a quilting guide attached to your presser foot and set the correct distance away from the first seam to use the guide from the face side. ~Amy***

This is the point where we will be using 3/8″ seam allowance. This will apply to everything having to do with the cups on this corset from here on. If you’re not going to be cupping the corset, you can skip to finishing it at this point.
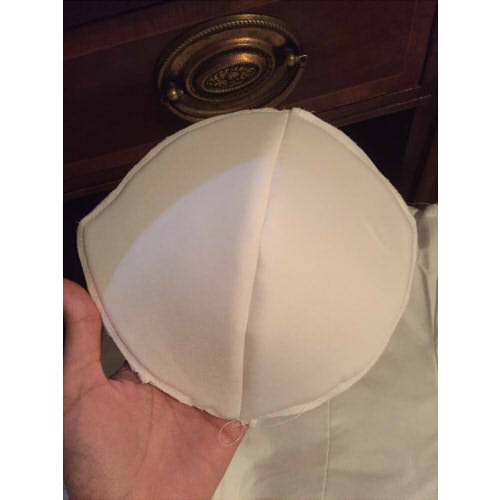
Like with the rest of the corset, you’re going to be basting the lining and the fashion fabrics together wrong sides together. The purpose of this is that since We’re going to be finishing this corset with a trim, turning it out will just add a lot of bulk to the seams. A difference here though is that the cup pieces will not have underlining. Instead, they will have the foam interfacing sewn in.

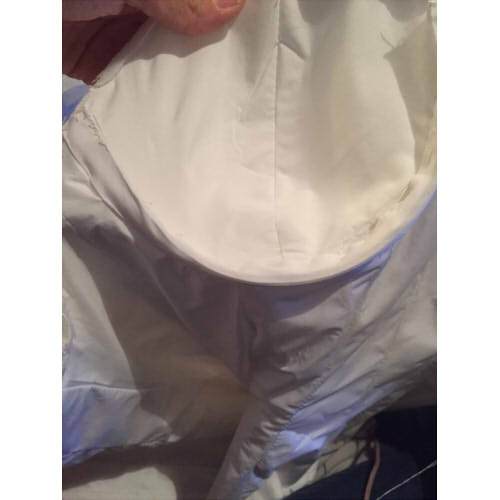
Sewing a curve to a curve can be daunting and messy. Luckily there’s a notch to make it a little easier, but it is still kind of a pain. The best way to do it is pinning it since by this point having the whole corset involved can make this whole process very cumbersome. It is really important to go slow and guide the fabric and remember to be careful in particular when going over the boning channels. When it’s done, the seam might look a little messy but luckily, that will be all taken care of in the next step.
***Before sewing and pinning, on the interior or concave curve (on the corset) make small cuts about 1/2″ apart within the seam allowance. This is for easing the interior curve to the exterior or convex curve (on the cup). Make sure you don’t cut all the way to the seam line. This technique works on all curves: Princess lines, circle skirts to waistbands, curved ruffles to straight lines, hat crowns to brims, collars to necklines, etc… ~Amy***
This next step will serve two purposes. One, it will clean up that ugly seam, and two, it will provide casing for your underwire. Here I used bias tape and sewed it in by hand. Doing it by hand has a lot of advantages. For one, you have infinitely more control in what you are sewing. Doing it by machine can lead to accidentally going too fast, and ending up in a lot of seam ripping. Another advantage is that in this case, it’s easier to manipulate than trying to shove everything through the machine and get it to look nice on the outside of the fabric. When your casing is done, just slide in the underwire, and sew the ends shut so it can’t slip out.
We’re nearing the last steps here! I am personally very excited to be this close to the finish. One of the last steps here is to finish the raw edges of the corset. Again, here I’m using white bias tape, and folding up the edges for a neat finish. Here you can just sandwich the corset edge in between the bias tape, with the narrower edge on the outside. This is another important place to go slow keep the needle by the edge of the bias tape so it looks neat.
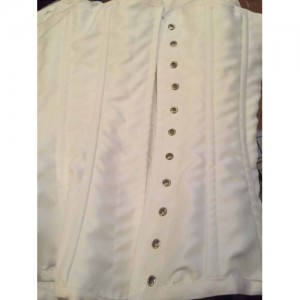
The very last step is adding in the grommets. There are a few ways to do this. I went with using a pair of grommet pliers and two part grommets/washers. For this, I made very small marks on the lining using the pattern piece for the back to dictate placement, and installed the grommets. It was a simple process of making small holes where I needed them, and putting in the grommets. How good it came out is worth how sore my hands got after all the squeezing I had to do here.
I have to say here that this pattern was definitely a learning experience. Doing all the extra little important things that I don’t normally do when I sew really made that extra difference in how in how the corset came out, and it’s something that I am proud of. I can’t think of much I would do differently but I would absolutely recommend doing a mockup if you’re unfamiliar with corsets.
All in all, I really liked this pattern and it gave me some good experience for the next time I draft my own!
I would rate myself as having moderate sewing experience. I’ve been sewing for a few years now and I’ve gotten a couple of awards but I’m still not quite where I want to be. I’m mostly self taught but I have taken a course in costume sewing. I thought the pattern was more geared to someone with at least some sewing experience because while it did have some good tips, it didn’t explain techniques and I felt it kind of assumed you sort of knew what you were doing. But I feel that a beginner could handle it if they really thoroughly read the instructions before hand. Personally, I had to actually do the things I wasn’t quite understanding to have the Aha! Moment for things that I didn’t quite get.
Article and Photographs ©Jack Spicer
Used with permission by www.MakingItYourself.com
~Thanks for the tutorial Jack, I’m sure people will find it helpful in deciding what pattern to buy and in constructing it.
~Happy Sewing, Amy
Many of us have purchased a pattern in what we thought was our size, only to find out that what we thought – is not what the pattern makers thought. Your best bet whenever you buy a pattern for anything is to test it out before possibly ruining your favorite fabric that you just spent your hard earned money on.
First, take accurate measurements of your body. Get help if you can, if your elbows are pointing out, the bust measurement isn’t necessarily accurate. Measure your bust, waist, and hips. Measure the distance between these measurements. Inseam (crotch to ankle), out seam (waist to ankle), arm length, back length, etc., are not necessary for every pattern, but take what you need. If you’ve got help, you may as well take all of your measurements and just store them with your patterns.
Before cutting out a multi-sized pattern look for the measurements on the tissue. Often you will be one size at the bust, different size at the waist and hip. Look at the measurements between the horizontal measurements, is the distance between your bust and waist longer or shorter than “industry standard”? If so, now is the time for easy changes. If your body is 2″ longer than the pattern, cut all of the pieces and tape a 2″ piece of paper in between. This is the “cut and spread” method of pattern alteration. If your body is shorter than the pattern, simply fold the pattern pieces to take out the excess. True up the curved lines and walk your pattern pieces along the seams to make sure that they still match each other.
Keep in mind that on the envelope the size 10 may say it’s for a 40″ hip, while the finished garment may have a 42″ hip ‘for ease’. Meaning they’ve allowed extra for you to bend over and sit. There may be extra ease in the bust for you to reach up. The ease they allow may or may not be what you are looking for, it also may throw you off as to what size you wear. You may want to compare what they give as the actual measurements to your own body, hold the tape measure at the exact measurement listed on the tissue around your body at the same place. Is is snug, loose, way too loose?
Once you have decided on the size to cut, I suggest that you always make a mock up first in muslin. (If you can’t find muslin you can use some old sheets. *If you sew in knits, save your old knit sheets to use as “muslin” to make mock ups.)
Try the garment on with the seam allowances on the outside so you can draw or pin what alterations you need to make. Again, this is usually easier with help from a friend. Remember to check for wearing comfort. Can you bend, sit, walk up stairs? You don’t want to split a seam while wearing your brand new creation. Transfer any necessary changes to the paper patterns.
When you are happy with the fit you can cut your pattern in the fabric of your choice, with the confidence that you will get exactly what you envisioned.
*Grading refers to taking a pattern and mathematically adjusting the size up or down at multiple locations horizontally and vertically. Unless you are making a size run of a single pattern, or you buy a size 24 and need a size 8, it is not necessary to grade it. If you love fractions and algebra (like me) you may want to learn this technique, but it can be confusing. If you want a quick reference check out this awesome article from Threads Magazine.
~Happy Sewing, Amy Delicious
Sign up for email news, special offers, and tips & tricks!


